⚡ Zapier MCP Server Configuration
Complete guide to integrate Zapier with AI4CALL: connect your assistant to over 6,000 applications for powerful automations via webhooks
Go to "MARKET" → "Marketplace Plugin" and click on Purchase of "Zapier" → FREE
Go to "MARKET" → "My Plugins" and click on Configure of "Zapier"
🚀 Quick Navigation:
⚠️ Third-party services
The integrations described refer to third-party services.
Rate limits, authentication methods, technical configurations, costs, and policies are defined exclusively by the respective providers and may change over time.
Costs for external services are borne directly by the end user to the service providers themselves and are in no way managed or mediated by our portal (e.g., Meta or other providers for WhatsApp, Zapier, Calendly, etc.).
- ✅ automatically save call data to Google Sheets or CRM
- ✅ send real-time notifications on Slack, Teams, or Discord
- ✅ create tasks on Trello, Asana, or Monday.com from customer requests
- ✅ send confirmation emails via Gmail or SendGrid
- ✅ update databases on Airtable, Notion, or SQL
- ✅ sync events with Google Calendar
Over 6,000 apps available - if an app exists, Zapier probably supports it!
What is Zapier and how the integration works
Zapier is a no-code automation platform that connects thousands of web applications, allowing you to create automatic workflows called "Zaps".
→ e.g., "Webhook receives data", "New email in Gmail", "New file in Drive"
2. Action: what to do when the trigger activates
→ e.g., "Add row to Google Sheets", "Send Slack message", "Create Trello task"
3. Multi-step workflow (optional): chain of sequential actions
→ e.g., Trigger: webhook → Action 1: Google Sheets → Action 2: Slack → Action 3: Email
[Customer calls]
   ↓
[AI4CALL Assistant collects data]
   ↓
[AI formats data into JSON]
   ↓
[POST sent to Zapier webhook]
   ↓
[Zapier receives and triggers Zap]
   ↓
[Zap executes configured actions]
   ↓
[Data saved on external apps]
Advantages:
- No code required - everything configurable via interface
- Connection to 6,000+ apps without developing custom integrations
- Complex workflows with conditional logic (IF/THEN)
- Automatic data transformation (format, filter, lookup)
- ✅ "Catch Hook" webhooks supported
- ✅ single-step Zap (1 trigger + 1 action)
- ⚠️ limit 100 tasks/month (each Zap execution = 1 task)
- ❌ no multi-step workflow
- ❌ no advanced filters
Zapier paid plans: unlimited tasks, multi-step Zaps, filters, conditional logic, high priority, support
For business use with many calls, consider at least the Starter or Professional plan.
Create the webhook on Zapier
The webhook is the URL that the AI4CALL assistant will use to send data to Zapier. Each Zap can have its own dedicated webhook.
- Log into your Zapier account
- Click "Create Zap" (or "Create" → "Zaps")
- In the "Trigger" section, search and select "Webhooks by Zapier"
- As "Event", choose "Catch Hook"
- Click "Continue"
- Zapier will automatically generate a unique webhook URL
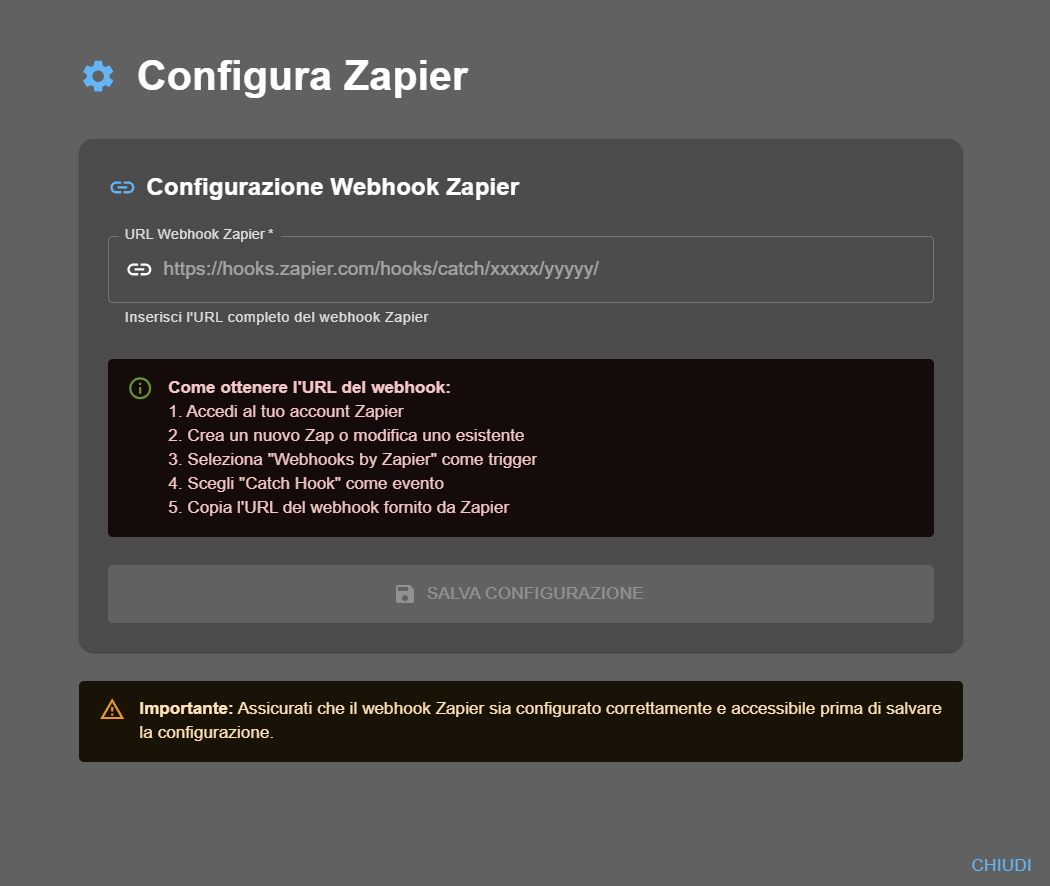
- Copy the full URL (format:
https://hooks.zapier.com/hooks/catch/xxxxx/yyyyy/) - Configure the actions you want to execute when the webhook receives data
- Publish the Zap ("Publish" or "Turn on Zap" button)
https://hooks.zapier.com/hooks/catch/[USER_ID]/[HOOK_ID]/
Where:
[USER_ID]: unique ID of your Zapier account (e.g., 123456)[HOOK_ID]: unique ID of this specific webhook (e.g., abcdef)
Complete example:
https://hooks.zapier.com/hooks/catch/123456/abcdef/
⚠️ Do not modify the URL - copy it exactly as provided by Zapier, including the trailing slash
/ Draft Zap (draft/off):
- ❌ the webhook will NOT receive data
- ❌ actions will NOT be executed
- ❌ AI4CALL will not receive errors (webhook accepts but does not process)
After configuring the webhook and actions, always click "Publish Zap" or "Turn Zap On" to activate it.
Verify the status in the Zapier dashboard: it must be ON
- Trigger: Webhooks by Zapier → Catch Hook → [copy URL]
- Action: Google Sheets → Create Spreadsheet Row
- Select destination Google Sheet
- Map fields: name from webhook → column "Name", email → column "Email", etc.
- Test the action with sample data
- Publish the Zap
Now when AI4CALL sends data to the webhook, Zapier will automatically add a row to the Google Sheet! 🎉
Configure the webhook in AI4CALL
Insert the Zapier webhook URL into the AI4CALL configuration to allow the assistant to send data.
- Select "Zapier" from your plugin list
- In the "Zapier Webhook URL" field, paste the full URL copied from Zapier
- Verify the URL is complete and correct (including
https://and trailing slash/) - Click "SAVE CONFIGURATION"
- ✅ the URL starts with
https://hooks.zapier.com/ - ✅ there are no spaces at the beginning or end
- ✅ the format matches
https://hooks.zapier.com/hooks/catch/xxxxx/yyyyy/ - ✅ the corresponding Zap on Zapier is published (ON)
If everything is correct, the integration is ready to use!
Anyone with the URL can send data to the Zap. To protect the webhook:
- 🔒 do not share the URL publicly
- 🔒 do not publish it in Git repositories or public documentation
- 🔒 use different webhook URLs for different environments (test/production)
- 🔒 if you suspect compromise, delete the Zap and recreate it with a new webhook
- 🔒 monitor Zap History for anomalous activity
For advanced security, consider adding validation logic in the Zap itself (e.g., verify a custom "api_key" field in the data).
Get the list of available tools
After configuring the webhook, you can get the list of all Zaps and actions configured in your Zapier account.
- Click the "Get tool list" button of the Zapier Plugin
- The system will query your Zapier account and show all active Zaps
- For each tool you will see: name, description, required parameters
- Save or copy this list to configure the assistant prompts
{
  "tools": [
    {
      "name": "save_to_google_sheets",
      "description": "save call data to Google Sheets CRM",
      "parameters": {
        "name": "customer full name",
        "email": "email address",
        "phone": "phone number",
        "notes": "conversation notes"
      }
    },
    {
      "name": "send_slack_notification",
      "description": "send urgency notification to Slack channel #support",
      "parameters": {
        "message": "notification text",
        "priority": "high/medium/low"
      }
    },
    {
      "name": "create_trello_task",
      "description": "create task on Trello board Customer Requests",
      "parameters": {
        "title": "task title",
        "description": "detailed description",
        "due_date": "optional due date"
      }
    }
  ]
}
Use this list to know exactly which tools are available and what parameters they require.
If:
- You create a new Zap → get the list again to see it appear
- You modify Zap parameters → get the list again to see the changes
- You deactivate/delete a Zap → get the list again to remove it
Best practice: get the list again every time you modify the Zapier configuration and update the assistant prompts accordingly.
Instruct the assistant to use Zapier
Configure the assistant's prompt to correctly use Zapier tools in automatic workflows.
"At the end of each call, automatically save to Google Sheets: customer name, phone, email, call reason, date/time, conversation duration. Use tool save_to_google_sheets with all fields filled."
2. Real-time urgency notifications:
"If the customer reports urgency, critical issue, or priority request, immediately send a Slack notification to the #support channel using tool send_slack_notification. Always mark with emoji 🚨. Include: urgency description, customer name, contact."
3. Task creation from requests:
"When the customer requests follow-up, quote, technical appointment, or any future action, automatically create a task on the 'Customer Requests' Trello board using tool create_trello_task. Include deadline if specified by the customer."
4. Automatic confirmation email:
"After collecting customer email and confirming request, send a confirmation email using tool send_gmail_email. Template: subject 'Request confirmation [TYPE]', body with conversation summary and next steps."
- Call the assistant and provide test data (name, email, phone)
- Make a request that should trigger Zapier (e.g., "I need a quote")
- The assistant should invoke the appropriate Zapier tool
- Verify on Zapier that the Zap executed (check Zap History)
- Verify on the final app (Google Sheets, Slack, etc.) that the data arrived
If everything works: ✅ integration configured correctly!
If there are errors: check Zap History on Zapier to see what happened.
🛠️ Zapier Tool System
Technical specifications on how the AI assistant communicates with Zapier via webhook and JSON data format.
Communication architecture
The AI assistant sends data to Zapier via an HTTP POST request with a structured JSON payload.
POST https://hooks.zapier.com/hooks/catch/xxxxx/yyyyy/
Content-Type: application/json

{
  "tool_name": "save_to_google_sheets",
  "name": "Mario Rossi",
  "email": "mario.rossi@example.com",
  "phone": "+393331234567",
  "notes": "Quote request installation",
  "timestamp": "2025-01-03T14:30:00Z"
}
HTTP/1.1 200 OK
Content-Type: application/json

{"status": "success"}
Important: Zapier immediately responds with 200 OK to indicate it received the data. Zap processing occurs in asynchronous background - the assistant does not receive confirmation of final execution.
Practical examples for common apps
{
  "name": "Mario Rossi",
  "email": "mario@email.com",
  "phone": "333-1234567",
  "date": "2025-01-03",
  "notes": "Info request"
}
Zapier will add a row with these values in the corresponding sheet columns.
{
  "channel": "#support",
  "message": "🚨 URGENCY",
  "customer": "Mario Rossi",
  "phone": "333-1234567",
  "problem": "System failure"
}
Zapier will send a formatted message to the specified Slack channel.
{
  "board": "Customer Requests",
  "list": "To Do",
  "title": "Installation quote",
  "description": "Customer: Mario Rossi
Tel: 333-1234567
Request: quote",
  "due_date": "2025-01-10"
}
Zapier will create a Trello card with these details.
{
  "to": "mario@email.com",
  "subject": "Request confirmation",
  "body": "Dear Mario Rossi,

we have received your request.
We will contact you soon.

Best regards"
}
Zapier will send an email via Gmail with the specified subject and body. - Understand Zapier → automation platform 6,000+ apps, workflows called Zaps
- Create webhook → on Zapier: Webhooks by Zapier → Catch Hook → copy URL
- Configure AI4CALL → insert webhook URL, save, verify Zap is published (ON)
- Get tool list → MCP Servers → Zapier → "Get tool list"
- Instruct assistant → logging, notifications, tasks, email workflows in prompt
❓ Frequently Asked Questions
Answers to the most common questions about the Zapier MCP Server integration
Zapier is an automation platform that connects over 6,000 web applications (Google Sheets, Slack, Gmail, Trello, CRM, etc.). Integration with AI4CALL allows the AI assistant to automatically send data to Zapier during calls, triggering predefined workflows (Zaps) to save information, send notifications, create tasks, and more.
Log in to Zapier, create a new Zap, select "Webhooks by Zapier" as the trigger app, choose "Catch Hook" as the trigger event. Zapier will automatically generate a webhook URL in the format https://hooks.zapier.com/hooks/catch/xxxxx/yyyyy/. Copy this full URL and insert it into the AI4CALL configuration.
Yes, "Catch Hook" webhooks are also available in Zapier's free plan. However, the free plan has limitations. For complex automations, consider Zapier's paid plans which offer unlimited tasks and multi-step Zaps.
After configuring the webhook in AI4CALL, go to "MCP Servers" in the dashboard, select "Zapier", and click "Get tool list". The system will query your Zapier account and show all configured Zaps with their names, descriptions, and required parameters. Save this list to properly configure the prompts.
The assistant can send any data collected during the conversation: customer information (name, email, phone), request details, timestamps, specific notes, form data filled, etc. The data is automatically formatted in JSON and sent to the Zapier webhook according to the schema defined in the assistant's prompt.
Method 1: use Zapier's "Test Trigger" after setting up the Catch Hook - send data manually and verify it's received. Method 2: make a test call to the AI4CALL assistant and ask it to send test data to Zapier. Method 3: use tools like Postman or curl to send a POST to the webhook with a test JSON payload.
Draft Zaps are NOT active and will NOT receive data from the webhook. Even if you correctly configure the URL in AI4CALL, data sent by the assistant will not be processed. You must always publish (turn on) the Zap on Zapier before the integration works. Verify the status is "ON" in the Zapier dashboard.
The Zapier webhook URL acts as a "shared secret" - anyone with the URL can send data. There is no additional authentication (username/password/API key). For security: do not share the webhook URL, use unique URLs for each integration, revoke and regenerate webhooks if you suspect compromise, monitor Zapier logs for anomalous activity.
Zapier has no strict rate limits for incoming webhooks, but recommends not exceeding 1 request per second per webhook. If the AI4CALL assistant sends many simultaneous requests, delays or queues may occur.
Yes, absolutely. The assistant can use Zapier together with other MCP servers (Calendly, Condomatica, Google Drive, etc.). Example: use Calendly to check availability, then Zapier to save the appointment to Google Sheets and send a Slack notification. MCP tools are composable and the LLM orchestrates them autonomously.
The AI assistant automatically formats data into JSON. You only need to specify in the prompt which fields to send. Example: "Send to Zapier: name, email, phone, notes". The AI will create: {"name":"Mario Rossi","email":"mario@email.com","phone":"333123456","notes":"Request info product X"}. Zapier will receive these fields ready for the workflow.
It depends on the Zapier action configured in the Zap. Some actions allow "Update" or "Update or Create" (e.g., Google Sheets Update Row, CRM Update Contact). If you configure a Zap with an update action, the assistant can update existing data. If you only use "Create", you will always create new records. Choose the appropriate action when configuring the Zap.
Not directly. Zapier webhooks only accept JSON data (text, numbers, booleans). For files: upload the file to cloud storage (Google Drive, Dropbox) using another MCP tool, get the file's public URL, pass the URL via the Zapier webhook. The Zap can then download the file from the URL and process it further.
Top use cases: Google Sheets (call logging, simple CRM), Slack (real-time team notifications), Gmail/Email (sending automatic confirmations), Trello/Asana (task creation from requests), Google Calendar (appointment sync), CRM (Salesforce, HubSpot, Pipedrive), Airtable (structured databases), Notion (automatic documentation), Discord (community notifications).